Global param
A macro is a small program written in Klipper/Gcode.
It can be called from:
- A GCODE file
- The Fluidd/Mainsail console (press the English letter
Cin Fluidd)
Note
The value in parentheses is the default value
LANG
Set the language for Z-Mod operation.
- LANG - language: en (English), ru (Russian), de (German), fr (French), it (Italian), es (Spanish), zh (Chinese), ja (Japanese), ko (Korean), pt (Portuguese), cs (Czech), tr (Turkish)
Example:
LANG LANG=en
SET_TIMEZONE
Change the timezone.
- ZONE - time zone (Asia/Yekaterinburg)
More details: SET_TIMEZONE.
NOZZLE_CONTROL
Control nozzle collision with the bed or part detachment.
Emergency shutdown of the printer if a weight overload is detected (AD5M and AD5X).
- WEIGHT - weight in grams (1500)
Settings persist after reboot.
Set NOZZLE_CONTROL WEIGHT=0 to disable this feature.
Control is disabled until the macro is first called.
After the first call, control is enabled automatically during printing.
When using the native screen, macro execution reboots the printer.
Without the native screen, restarts Klipper (configuration files are modified).
Works automatically, but additional macros are available for Gcode:
ZCONTROL_ON- enable controlZCONTROL_OFF- disable controlZCONTROL_STATUS- check statusZCONTROL_PAUSE- pause on trigger (only after command queue clears; avoid using on initial layers)ZCONTROL_ABORT- abort Klipper on triggerZCONTROL_AUTO- On trigger, stop Klipper (if Z height <ZCONTROL_Z) or call PAUSE if z >=ZCONTROL_ZZCONTROL_Z Z=10- Set Z height.SAVE_ZMOD_DATA ZCONTROL_Z=10- Save Z height. If you don't want to enable pause, setSAVE_ZMOD_DATA ZCONTROL_Z=230
To enable nozzle control on initial layers, add ZCONTROL_PAUSE in the slicer at the layer where a pause should be used instead of aborting.
The phrase "Control is not active" means that control is not being used at that moment, but it will be activated automatically during printing.
GET_ZMOD_DATA
Retrieve Z-Mod global parameters/flags. After execution, the console displays saved parameters applied at runtime.
Fluidd -> Macros -> Main -> Z-Mod PARAMETERS
PLUGINS
Displays the plugin management menu.
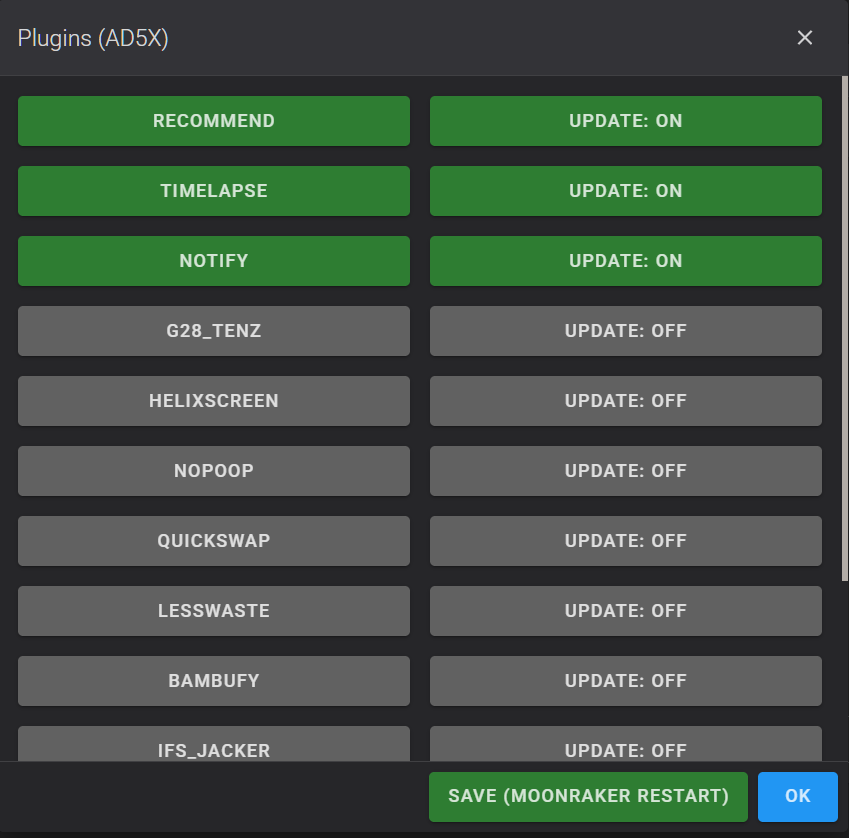
In this menu you can enable, disable and completely remove additional plugins.
- Left column (activation): click to enable or disable the plugin.
- Green button — the plugin is active.
- Gray button — the plugin is disabled.
- Right column (updates): enables or disables automatic updates via Moonraker.
- UPDATE: ON — updates are enabled.
- UPDATE: OFF — updates are disabled.
How to completely remove a plugin:
If you no longer need a plugin, make both of its buttons gray (disable the plugin itself and its updates), press SAVE (MOONRAKER RESTART), and then reboot the printer. The system will automatically delete its folder from mod_data/plugins/.
GLOBAL
Simplified management of global parameters. Only parameters that can be changed with a button click are available. Parameters that require entering a number, specifying a file name, etc. are not controlled by this macro.
After changing parameters, it is recommended to restart the printer.
SAVE_ZMOD_DATA
Save Z-Mod global parameters/flags (applied during every print).
Do not add this macro to start/end Gcode or Gcode files. Call it from the Fluidd/Mainsail console. Parameters are stored in the printer memory in mod_data/variables.cfg and survive a shutdown, so you do not need to enter them every time (do not edit this file manually — you will break Klipper or the mod).
To edit parameters:
- Go to
Fluidd->Macros->System->SAVE Z-Mod PARAMETERS, select the parameter, modify it, and clickSEND. - Alternatively, enter commands directly in the Fluidd console, e.g.,
SAVE_ZMOD_DATA CLOSE_DIALOGS=2. Check the output in the Fluidd console.
Print color selection menu parameters
Color selection menu parameters are all for the AD5X only.
ALLOWED_TOOL_COUNT
Number of tools to show in the color selection menu. This refers to the T0, T1, etc commands in the gcode file, not the physical spools in your IFS.
If Z-Mod is able to successfully scan the file for used tools, this will be overridden and the tools used in the file will be shown.
This setting cannot be used when the native screen is enabled.
Example: SAVE_ZMOD_DATA ALLOWED_TOOL_COUNT=4
SCAN_FILE_COLORS
3MF
For 3MF files, scanning and color mapping are instant; the preprocessor is not needed.
Enables scanning gcode files for which toolchange commands (T0, T1, etc) are used, and what colors and materials they are mapped to in the slicer: 0 (disable), 1 (enable), 2 (disable full scan, but look for data prepared by slicer script)
Example: SAVE_ZMOD_DATA SCAN_FILE_COLORS=0
COLOR_MENU_1_BASED
Determines whether to show 0-based (T0, T1, etc) or 1-based (Color 1, Color 2, etc) labels in the color selection menu. This does not change anything other than how the buttons are labelled and is purely for convenience: 0 (0-based), 1 (1-based)
Example: SAVE_ZMOD_DATA COLOR_MENU_1_BASED=1
AUTO_ASSIGN_COLORS
Determines whether to attempt automatic mapping of toolchange commands (T0, T1, etc) to physical filament loaded in your IFS when starting a print. Unless you have enabled silent mode, the color selection menu will still appear; this setting only affects the default selections: 0 (disable), 1 (enable)
This setting will also apply to prints started in silent mode. You can configure it to abort the print if certain errors arise with the auto-assignment: 2 (abort if any materials cannot be matched, allow color mismatches), 30 (abort on any issues)
For custom values for error conditions in silent mode, add the following values together to determine the right setting:
- 2 (At least one material cannot be matched; eg. the gcode file specifies ABS, but you only have PLA loaded; or material data could not be loaded)
- 4 (At least one color cannot be matched at all, usually due to file scanning being disabled or failing)
- 8 (At least one color is potentially a poor match)
- 16 (At least one physical spool has been assigned to more than one tool index in the file)
Example: SAVE_ZMOD_DATA AUTO_ASSIGN_COLORS=0
PURGE_ALL_EXTRUDERS
Creator 5 / Creator 5 Pro only
Extruder purge at print start:
- 0 - purge only the first (starting) extruder (default)
- 1 - purge all used extruders
The extruders purged are those involved in mapping the file's colors to the physical spools. If several colors are assigned to the same spool, that extruder is purged once.
When Auto PA is enabled (PRINT_AUTOPA or the Auto PA button in the print menu), all used extruders are already purged during PA calibration, so this parameter has no effect.
Example: SAVE_ZMOD_DATA PURGE_ALL_EXTRUDERS=1
UNUSED_EXTRUDERS_OFF_TIME
Creator 5 / Creator 5 Pro only
Turn off heating of idle extruders during multi-color printing after a set time (in minutes):
- 0 - do not turn off
- 5, 10, 20, 40, 60 - after how many idle minutes the extruder heating is turned off
In the menu the parameter is shown as "Turn off idle extruders in N min".
For correct operation, Ooze prevention must be enabled in the slicer (Print settings > Multimaterial > Ooze prevention).
Example: SAVE_ZMOD_DATA UNUSED_EXTRUDERS_OFF_TIME=5
Print start/bed mapping parameters [START_PRINT]:
MIDI_START
Play MIDI on print start (""), 0 to disable.
Example: SAVE_ZMOD_DATA MIDI_START=Pain-Shut-your-mouth.mid
PRECLEAR
Enable nozzle pre-clearing in CLEAR_NOZZLE: 0 (no), 1 (yes) (0).
Example: SAVE_ZMOD_DATA PRECLEAR=0
PRINT_LEVELING
Build bed mesh before each print (using native screen if enabled): 0 (no), 1 (yes) (0). For native screen bed leveling, enable "Local Network Only" via the printer menu: Settings -> WiFi icon -> Network Mode.
Example: SAVE_ZMOD_DATA PRINT_LEVELING=1
PRINT_AUTOPA
Creator 5 / Creator 5 Pro only
Select PA (Pressure Advance) for each print: 0-no, 1-yes (0).
For Auto PA to work from the native screen, enable "Local Network Only" via the printer menu: Settings -> WiFi icon -> Network Mode.
Example: SAVE_ZMOD_DATA PRINT_AUTOPA=1
USE_KAMP
Fast KAMP
KAMP is enabled automatically and works without slow object exclusion. For 3MF the KAMP data is available instantly, for G-code — after the file is scanned.
Use Adaptive Mesh (KAMP) instead of full bed mesh where possible: 0 (no), 1 (yes) (0).
Recommended to set SAVE_ZMOD_DATA CLEAR=LINE_PURGE to align purge location with KAMP mesh.
Allows using KAMP when leveling is started from the native screen over the network.
Example: SAVE_ZMOD_DATA USE_KAMP=1
MESH_TEST
Test the bed mesh before printing:
- 0 - No
- 1 - Test WITHOUT Z-Offset auto-tuning (default)
- 2 - Test WITHOUT Z-Offset auto-tuning, if the mesh doesn't match, run KAMP
- 3 - Test WITH Z-Offset auto-tuning, with nozzle cleaning
- 4 - Test WITH Z-Offset auto-tuning, with nozzle cleaning, if the mesh doesn't match, run KAMP
Z-Offset Auto-Tuning
Algorithm for automatic Z-Offset calibration:
- Source data: The printer's memory stores a bed mesh (AD5M/AD5X: 25 points, C5Pro: 100 points) obtained during the last leveling procedure.
-
Preparation:
- For AD5M/AD5X the nozzle is heated to the working temperature, wiped on the bed, and cooled down to the bed probing temperature: TEMP_TEST_MAX (151 by default) if the target nozzle temperature is above 230°C, otherwise TEMP_TEST_MIN (121 by default).
- For Creator 5 / Creator 5 Pro the active extruder is parked.
-
Measurement point selection:
- The center point of the mesh is used.
-
Measurement and comparison:
- A new probe measurement (PROBE) is performed at the selected point.
- The obtained value is compared with the value saved in the bed mesh.
-
Offset correction:
- If the discrepancy is less than 0.3 mm, the difference is added to the current Z-Offset value.
- If the discrepancy is greater than or equal to 0.3 mm, the system considers the saved mesh outdated and, if the settings allow, automatically initiates a bed re-leveling procedure (KAMP).
Without Z-Offset Auto-Tuning
Bed mesh validation algorithm:
- Measurement: A standard probe measurement (PROBE) is performed at the current point.
- Validation: The obtained Z value is checked for consistency with the loaded mesh.
- Criterion: The value must be within the range from (mesh minimum - 0.21 mm) to (mesh maximum + 0.21 mm).
-
Result:
- Success: The mesh is considered correct, printing continues.
- Failure: A warning is issued and printing stops or, if settings allow, a bed re-leveling procedure (KAMP) is started automatically.
Notes for the check without auto-tuning:
- This check is a rough estimate. It is intended to detect critical errors, for example, when a mesh taken for a PEI sheet is loaded for thick glass and vice versa.
- Do not rely on this check as absolute protection.
- When using smart cleaning (KAMP), the heating wait occurs near the cleaning location, not in the corner of the bed.
- The check is performed with a hot nozzle.
Example: SAVE_ZMOD_DATA MESH_TEST=0
TEMP_TEST_MIN
Lower nozzle temperature for the bed contact test in MESH_TEST modes 3/4 (with nozzle cleaning). If the target nozzle temperature is 230°C or lower, the nozzle is cooled down to this temperature before probing. Default: 121.
Lower the value if your build plate does not tolerate the default temperature: on PC plates (glass transition point ~145-150°C) and some G10 plates a hot nozzle leaves deep imprints in the surface.
This parameter is not set via SAVE_ZMOD_DATA — enter the command in the Fluidd/Mainsail console (the value is stored in mod_data/variables.cfg):
Example: SAVE_VARIABLE VARIABLE=temp_test_min VALUE=110
- Recommended range: 100-150. The new value applies from the next print, no restart required.
- Only used where nozzle wiping/cleaning is performed (MESH_TEST 3/4). In modes 1/2 (default) the mesh is checked at full print temperature without cooling down.
TEMP_TEST_MAX
Upper nozzle temperature for the bed contact test in MESH_TEST modes 3/4 (with nozzle cleaning). If the target nozzle temperature is above 230°C, the nozzle is cooled down to this temperature before probing. Default: 151.
Usage is the same as for TEMP_TEST_MIN — lower the value for temperature-sensitive build plates (PC, some G10).
Example: SAVE_VARIABLE VARIABLE=temp_test_max VALUE=140
FORCE_MD5
Igor Polunovskiy
Note: Only applies when sending G-code. Not required for 3MF.
Verify file MD5 hash and delete on mismatch: 0 (disable), 1 (enable) (1).
- Select and download the file for your architecture and operating system:
- zmod_preprocess-windows-amd64.exe - Windows
- zmod_preprocess-linux-amd64 - Linux. Don't forget to run
chmod +x zmod_preprocess-linux-amd64 - zmod_preprocess-darwin-arm64 - macOS Apple Silicon. Don't forget to run
chmod +x zmod_preprocess-darwin-arm64 - zmod_preprocess-darwin-amd64 - macOS Intel. Don't forget to run
chmod +x zmod_preprocess-darwin-amd64 - zmod-preprocess.py - Universal Python. Don't forget to run
chmod +x zmod-preprocess.py - zmod-preprocess.sh - Linux/MacOS Bash. Don't forget to run
chmod +x zmod-preprocess.sh
- In Orca, you need to specify:
Process Profile->Other->Post Processing Scripts.
Here are the options for adding:
"C:\path_to_file\zmod_preprocess-windows-amd64.exe";"C:\python_folder\python.exe" "C:\Scripts\zmod-preprocess.py";"/usr/bin/python3" "/home/user/zmod-preprocess.py";"/home/user/zmod-preprocess.py";"/home/user/zmod_preprocess-darwin-amd64";"/home/user/zmod_preprocess-darwin-arm64";"/home/user/zmod_preprocess-linux-amd64";
Example: SAVE_ZMOD_DATA FORCE_MD5=1
DISABLE_SKEW
1 (disable SKEW correction), 0 (load skew_profile via SKEW_PROFILE LOAD=skew_profile) (1).
Example: SAVE_ZMOD_DATA DISABLE_SKEW=1
LOAD_ZOFFSET
Creator 5 / Creator 5 Pro
On Creator 5 / Creator 5 Pro the Z-offset with the native screen and in screenless mode is the same — they are fully synchronized. If the native screen is disabled, you can change the Z-offset during printing via GuppyScreen, HelixScreen, Fluidd or Mainsail — it will be saved.
Load Z-offset from global parameters saved via SET_GCODE_OFFSET: 1 (yes), 0 (no) (1).
Example: SAVE_ZMOD_DATA LOAD_ZOFFSET=0
DISABLE_PRIMING
Disable nozzle priming via extrusion: 0 (no), 1 (yes) (0).
Example: SAVE_ZMOD_DATA DISABLE_PRIMING=0
CLEAR
Select nozzle purge algorithm (LINE_PURGE):
- _CLEAR1 - Orca-style
- _CLEAR2 - FF group style
- _CLEAR3 - FF group alternative
- _CLEAR4 - Shreider's code (top-right to bottom-right)
- _CLEAR_TRAP - For brushes (top-right to bottom-right)
- LINE_PURGE - KAMP purge
If you use KAMP, the purge is forced to LINE_PURGE (instead of _CLEAR1, _CLEAR2, _CLEAR3, _CLEAR4).
If you use LINE_PURGE but have not enabled object labeling in Orca, _CLEAR2 is used instead.
Custom purge macros can be added to mod_data/user.cfg — put the macro name into this parameter.
Example: SAVE_ZMOD_DATA CLEAR=LINE_PURGE
5M/5M Pro: This is not a replacement for the native cleaning (CLEAR_NOZZLE), where the nozzle pokes the middle of the bed and then wipes the plastic off on the bed. This is nozzle priming right before printing.
To disable nozzle priming with a line, use DISABLE_PRIMING
Print end/cancel parameters [END_PRINT]:
MIDI_END
Play MIDI on print end (""), 0 to disable.
Example: SAVE_ZMOD_DATA MIDI_END=Pain-Shut-your-mouth.mid
CLOSE_DIALOGS
Automatically close dialogs after print end/cancel: 0 (no), 1 (yes, slow), 2 (yes, fast) (0). For fast closing, enable "Local Network Only" via the printer menu: Settings -> WiFi icon -> Network Mode.
Example: SAVE_ZMOD_DATA CLOSE_DIALOGS=2
STOP_MOTOR
Automatically disable motors 25 seconds after print end/cancel: 0 (no), 1 (yes) (1).
Example: SAVE_ZMOD_DATA STOP_MOTOR=1
AUTO_REBOOT
Automatically reboot the printer after printing completes (0):
- 0 - no reboot
- 1 - reboot the printer via the
REBOOTcommand - 2 - without the native screen: reboot the firmware via
FIRMWARE_RESTART; with the screen: reboot the printer via theREBOOTcommand
Example: SAVE_ZMOD_DATA AUTO_REBOOT=0
System-wide parameters:
MOTION_SENSOR
Use a filament motion sensor instead of the filament presence sensor (0):
- 0 - no (the filament presence sensor is used)
- 1 - yes (the filament motion sensor is used)
When using the filament motion sensor, disable it on the native screen; otherwise, printing will stop.
If the filament presence sensor is used in screenless mode, the following message is shown when it triggers: "Filament has run out. Pause in 30 seconds".
Example: SAVE_ZMOD_DATA MOTION_SENSOR=1
SILENT
AD5X only
Do not show the color selection window when starting printing
- 0 - show the window (default)
- 1 - do not show the window, use previously set colors
- 2 - do not show the window, do not use IFS
Example: SAVE_ZMOD_DATA SILENT=0
AUTOINSERT
AD5X Only
Automatically Load Filament
- 0 - Do not automatically load filament
- 1 - Automatically load filament (default)
Example: SAVE_ZMOD_DATA AUTOINSERT=0
ALWAYS_FULL_COLOR_CHANGE
AD5X only
Determines whether or not to skip the color change process if the before and after colors are mapped to the same physical spool.
- 0 - skip the process (default)
- 1 - do not skip the process
Example: SAVE_ZMOD_DATA ALWAYS_FULL_COLOR_CHANGE=0
USE_TRASH_ON_PRINT
AD5X only
Only when running without the native display
Use trash on color change during printing
- 0 - no purge in trash chute
- 1 - purge in trash chute (default)
- 2 - travel to trash chute after color change but do not purge
Example: SAVE_ZMOD_DATA USE_TRASH_ON_PRINT=0
REMOVE_FILAMENT
AD5X only
Only when running without the native display
Unload filament after print completion:
- 0 — do not unload (default)
- 1 — unload
Example: SAVE_ZMOD_DATA REMOVE_FILAMENT=1
FIX_SCV
Fix incorrect SCV (square_corner_velocity) when rendering acceleration graphs and calculating input shapers.
- 0 - keep the parameter as in stock (5)
- 1 - use
square_corner_velocityfrommod_data/user.cfgorprinter.base.cfg
Example: SAVE_ZMOD_DATA FIX_SCV=1
In our printer, square_corner_velocity: 25, but shaper graph calculations and accelerations are based on SCV = 5.
This primarily affects displayed accelerations and calculated smoothing levels.
shaper_type_x, shaper_freq_x, shaper_type_y, shaper_freq_y remain unchanged.
However, with correct calculations, the resulting accelerations drop by approximately half.
Recommendation: add the following to mod_data/user.cfg:
[printer]
square_corner_velocity: 9
WIFI
On some firmware versions, Wi-Fi occasionally fails to start.
To fix this, connect to a Wi-Fi network via the native screen.
- Call
SAVE_ZMOD_DATA WIFI=1 - Turn off the printer
- Turn on the printer
- 0 — use Wi-Fi from the native screen
- 1 — use Wi-Fi through Z-Mod
FIX_E0011
Common causes of E0011 error (Timer too close):
- Host did not respond within the allotted time (0.025 sec)
- MCU did not respond within the allotted time (0.025 sec)
Specific causes:
- Frozen Nations MCU mainboard or eboard.
Lost communication with MCU 'mcu'. Solution: Reboot. Replace the mainboard (mcu) or extruder board (eboard). - Host CPU overload (shaper calculations/graph rendering).
- EMMC overload (git operations, backups, large file uploads during printing, etc.).
- Insufficient RAM. Solution: Re-solder the CPU and upgrade to 256MB RAM.
- Damaged extruder cable. Solution: Replace/fix the cable.
- Loose extruder board cable connection. Solution: Replace the extruder board.
- SWAP data loading (SWAP resides on EMMC, which operates at 10 MB/s; SWAP data during shaper calculations can reach 25MB). Solution: Disable SWAP if you have 256MB RAM via
SAVE_ZMOD_DATA USE_SWAP=0. - MCU firmware crash. Solution: Reflash the MCU via factory reset or use the UPDATE_MCU mod.
Fix E0011 and Communication timeout during homing errors. Changing this parameter will reboot the printer. 0-no, 1-yes (0):
- 0 - keep the stock parameter (0.025)
- 1 - set the parameter to 0.1
Example: SAVE_ZMOD_DATA FIX_E0011=1
This error may also occur:
- Large volume of model exclusions: Solution:
Process Profile->Other->Output G-code-> uncheckExclude models. - If you disabled swap on FF5M/FF5MPro.
Run the MEM macro and see if there is swap and what size it is.
Enable swap if it is disabled: SAVE_ZMOD_DATA USE_SWAP=1
- If on FF5M/FF5MPro you run a full test, i.e. PID calibration, bed mesh probing and shaper calibration at the same time.
It is better to carry out all calibrations according to this guide
- If you use Klipper 13 on AD5X. In this case you can return to the native Klipper by running
UPDATE_MCU FORCE=12. - If fuzzy skin is used and the CPU cannot keep up with calculating the toolpath. Disable fuzzy skin or tune its parameters.
The Communication timeout during homing error may occur due to high communication latency between the host and MCUs. Round-trip time should consistently stay below 10ms. Temporary latency spikes can cause homing failures.
TRSYNC_TIMEOUT is a Klipper parameter (default: 0.025 sec) that compensates for system delays.
Stock file /opt/klipper/klippy/mcu.py sets TRSYNC_TIMEOUT = 0.025. The patch changes it to TRSYNC_TIMEOUT = 0.1.
How to fix on stock firmware:
- Format a USB drive as FAT32(MBR).
-
Save the
flashforge_init.shfile to the USB: -
Power off the printer.
- Insert the USB into the printer.
- Power on the printer (it will beep loudly).
- Wait for reboot.
- Remove the USB.
- Reprint the problematic file; E0011 should no longer occur.
Manual fix on stock firmware:
- Install root.
- Use WinSCP to SSH into the printer.
- Edit
/opt/klipper/klippy/mcu.py. - Locate
TRSYNC_TIMEOUT = 0.025and change it toTRSYNC_TIMEOUT = 0.1. - Save the file and reboot the printer.
FIX_E0017
Fix E0017 error. Changing this parameter will reboot the printer. 0-no, 1-yes (1):
In the stock file /opt/klipper/klippy/toolhead.py, LOOKAHEAD_FLUSH_TIME = 0.5. Original Klipper uses LOOKAHEAD_FLUSH_TIME = 0.250. Our mod works best with LOOKAHEAD_FLUSH_TIME = 0.150.
- 0 - set to stock value
- 1 - set to 0.150
Example: SAVE_ZMOD_DATA FIX_E0017=1
How to fix on stock firmware:
- Format a USB drive as FAT32(MBR).
-
Save the appropriate file to the USB:
- Adventurer5M-e0017-4.tgz for FlashForge 5M
- Adventurer5MPro-e0017-4.tgz for FlashForge 5M Pro
-
Power off the printer.
- Insert the USB into the printer.
- Power on the printer (it will beep loudly).
- Wait for reboot.
- Remove the USB.
- Reprint the problematic file; E0017 should no longer occur.
Manual fix on stock firmware:
- Install root.
- Use WinSCP to SSH into the printer.
- Edit
/opt/klipper/klippy/toolhead.py. - Locate
LOOKAHEAD_FLUSH_TIME = 0.5and change it toLOOKAHEAD_FLUSH_TIME = 0.150. - Save the file and reboot the printer.
LED
LED brightness at startup (50).
Example: SAVE_ZMOD_DATA LED=50
WEB_SCREEN
Redirect the printer screen as a virtual screen camera in Fluidd/Mainsail and zmod.link
- 0 - Do not redirect
- 1 - Redirect (default)
Example: SAVE_ZMOD_DATA WEB_SCREEN=1
MIDI_ON
Play MIDI at startup (""). Use 0 to disable.
Example: SAVE_ZMOD_DATA MIDI_ON=Pain-Shut-your-mouth.mid
NEW_SAVE_CONFIG
Use alternative SAVE_CONFIG (invokes SAVE_CONFIG without freezing the native screen). NEW_SAVE_CONFIG for PID calibration: 0-no, 1-yes (0).
Example: SAVE_ZMOD_DATA NEW_SAVE_CONFIG=0
USE_SWAP
Enable SWAP (1):
- 0 - no (Only for upgraded 256MB RAM)
- 1 - yes, on EMMC
- 2 - yes, if possible on USB FLASH(FAT32(MBR)) for the brave and confident (in fact, it works 90% slower than EMMC)
Example: SAVE_ZMOD_DATA USE_SWAP=1
CHINA_CLOUD
Enable Chinese cloud services: 0-no, 1-yes (1).
Example: SAVE_ZMOD_DATA CHINA_CLOUD=0
Even if all cloud options are disabled via the screen, the printer still attempts to send photos, videos, and telemetry to Chinese servers.
Setting this parameter to 0 partially disables these "features."
If Chinese clouds are disabled, the printer will not check for stock firmware updates.
To update stock firmware, enable Chinese clouds via SAVE_ZMOD_DATA CHINA_CLOUD=1, reboot, and proceed with the update.
Instead, you can use:
- zmod.link - a cloud for managing printers via Fluidd/Mainsail.
- Telegram bot.
To disable Chinese clouds on stock firmware:
- Format a USB drive as FAT32(MBR).
- Place flashforge_init.sh on the USB.
- Power off the printer.
- Insert the USB into the printer.
- Power on the printer (it will reboot once).
- Remove the USB.
To enable Chinese clouds on stock firmware:
- Format a USB drive as FAT32(MBR).
- Place flashforge_init.sh on the USB.
- Follow the same steps as above (the printer will reboot once).
NICE
Set Klipper process priority: 1 (lowest) to 40 (highest) (20).
Example: SAVE_ZMOD_DATA NICE=20
Higher priority allocates more resources to Klipper but may cause Moonraker and camera disconnections.
For Linux users:
NICE=20
grep -q "^nice = " /opt/config/mod_data/variables.cfg && NICE=$(grep "^nice = " /opt/config/mod_data/variables.cfg | cut -d "=" -f2| awk '{print $1}')
NICE=$((20-$NICE))
[ $NICE -ge 20 ]  && NICE=19
[ $NICE -lt -20 ] && NICE=-20
renice $NICE $(ps |grep klippy.py| grep -v grep| awk '{print $1}')
DISPLAY_OFF_TIMEOUT
Set the time (in seconds) after which the native screen is turned off when working in screenless mode. Default: 180.
Note: The native screen needs at least 5 seconds to configure WiFi.
Example: SAVE_ZMOD_DATA DISPLAY_OFF_TIMEOUT=120
ORCA_FF
AD5X / Creator 5 / Creator 5 Pro only
Native screen emulator for OrcaSlicer and Flash Studio when the native screen is off. Lets you choose spools for colors right in the slicer when sending a print (instead of the Fluidd print menu) and work with the printer from Flash Studio: discover it on the network, send files, monitor and control the print.
Works only when the native screen is disabled (DISPLAY_OFF).
- 0 - Do not use (default)
- 1 - Use
The change takes effect after the printer is rebooted.
Example: SAVE_ZMOD_DATA ORCA_FF=1
Connection in the slicer:
- Host type:
FlashForge - Hostname:
IP_printer - API key / password:
zmod(or the data from the native screen) - Serial number:
zmod(or the printer serial number)
AFC
AD5X / Creator 5 Pro only
Show the IFS slots (AD5X) and toolheads (Creator 5 Pro) in Fluidd and Mainsail as a standard AFC panel. Works both with and without the native screen. Details: AD5X, Creator 5 Pro.
- 0 - Do not use (default)
- 1 - Use
The change takes effect after restarting Klipper.
Example: SAVE_ZMOD_DATA AFC=1
KLIPPER_C5
Creator 5 / Creator 5 Pro only
Use shapers from Klipper 13.
- 0 - Do not use (default)
- 1 - Use
Example: SAVE_ZMOD_DATA KLIPPER_C5=1
PRO_POWEROFF_TIMEOUT
Set the timeout (in minutes) for FF5M Pro to auto-power off. Default: 0 (disabled).
Example: SAVE_ZMOD_DATA PRO_POWEROFF_TIMEOUT=10
SAVE_MOONRAKER
- 0 - Load macro button layouts from Z-Mod (default).
- 1 - Allow saving macro button changes locally in Fluidd/Moonraker.
Locally saved macros are stored in a separate section.
Example: SAVE_ZMOD_DATA SAVE_MOONRAKER=1
SAVE_FILAMENT_SENSORS
- 0 - Do not save the state of filament sensors after a reboot; they will always be enabled (default)
- 1 - Save the state of the sensors after a reboot. If you disable a sensor, it will also be disabled after a reboot.
Example: SAVE_ZMOD_DATA SAVE_FILAMENT_SENSORS=1