FAQ
Frequently Asked Questions
Note
Installed the mod.
Don't want to figure anything out - print as you did before.
No need to configure or change anything anywhere.
Decided you're ready to move forward - proceed by reading the documentation.
Configuration Storage
Access the mod_data folder via Fluidd web interface:
Configuration → Configuration Files → mod_data
- Custom Klipper settings go into
mod_data/user.cfg, which can override/supplementprinter_base.cfgand Z-Mod files. - Custom Moonraker settings go into
mod_data/user.moonraker.conf. - Custom MIDI files are stored in
mod_data/midi/. - Global mod settings are saved via the SAVE_ZMOD_DATA macro.
- Shutdown scripts are stored in
mod_data/power_off.sh. - Power on scripts are stored in
mod_data/power_on.sh.
You cannot make changes to zmod and plugin files, as this will break the update system.
Any function can be overridden in mod_data/user.cfg or printer.cfg
Known Peculiarities:
- During actions like
M109(extruder heating),M190(bed heating), PID calibration, or any gcode-pausing task, the stock screen freezes. - Restarting Klipper (after saving the bed mesh, PID, shapers, etc.) freezes the stock screen (use NEW_SAVE_CONFIG for restarts or the global parameter).
- After canceling a print, press "OK" on the stock screen (use CLOSE_DIALOGS or FAST_CLOSE_DIALOGS or the global parameter).
- The stock screen always loads the
DEFAULT_MESHprofile when starting a print and deletes theDefaultprofile post-print.
Screenless Version Notes:
- Remove all start gcode and use START_PRINT and END_PRINT macros.
- Stock camera disabled; use the alternative via CAMERA_ON.
- AD5M/AD5X: If needed, manually set
Z_OFFSETin START_PRINT or use LOAD_ZOFFSET to load saved offsets. - If you want to transfer z-offset from the native screen to screenless mode, call the macro
LOAD_ZOFFSET_NATIVE— it will read the z-offset value from the native screen and apply it to screenless mode. Not required for Creator 5 / Creator 5 Pro. - Bed mesh
autoloads automatically on startup. -
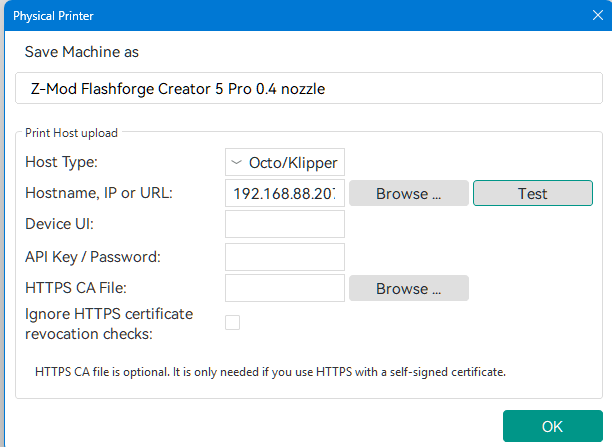
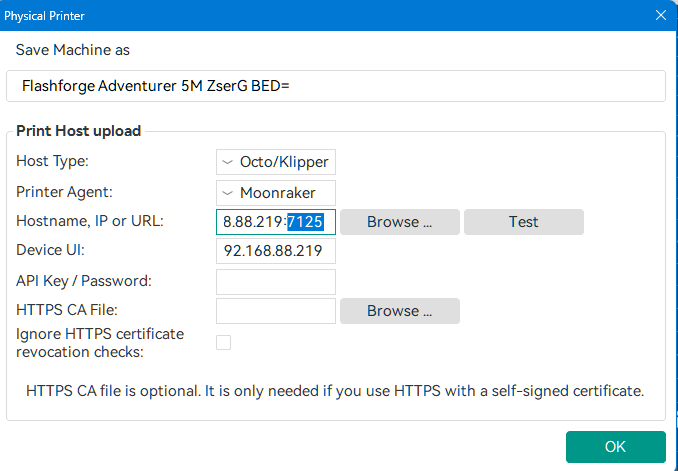
FlashForge protocol is unsupported (handled by the screen). Use "Octo/Klipper":
- Host Type:
Octo/Klipper - Printer Agent:
Moonraker
For Creator 5 / Creator 5 Pro / AD5X:
- Hostname:
IP_printer
For FF5M / FF5M Pro:
- Hostname:
IP_printer:7125 - Device UI:
IP_printerorIP_printer:80
- Host Type:
What's the difference between using the screen and without the native screen?
The printer can operate in two modes:
- With the native screen - in this case, almost all operating logic is controlled by the native screen, and many features cannot be changed.
- Without the native screen - in this case, all features are controlled by Z-Mod. This doesn't mean you need to turn off the screen or replace it with a different one. In the mode without the native screen, you can use the alternative software screen GuppyScreen/HelixScreen or turn off the screen completely, and it will go dark.
Warning
Do not disable the screen unless you fully understand bed leveling, z-offset, and START_PRINT/END_PRINT macros
AD5M/AD5M Pro have 128 MB of RAM; half of it is used by the system, and native screen management takes 13 MB (20 MB in older stock firmware versions). Disabling the native screen saves this memory.
Disabling the screen saves RAM but changes print management (start/pause/resume/cancel/recovery, file upload, power-loss recovery). Modify start/end G-code accordingly. elk
Without the screen, Z-offset from the screen isn't applied. Use START_PRINT parameters or global settings. Details
To transfer the z-offset from the native screen to screenless mode, run LOAD_ZOFFSET_NATIVE — it reads the z-offset from the native screen and applies it to screenless mode. Not required for Creator 5 / Creator 5 Pro.
Read features of screenless operation.
How is Z-Mod different from KlipperMod/native firmware?
Differences between KlipperMod and Z-Mod:
- KlipperMod uses pure Klipper with minimal FlashForge 5M (Pro)-specific changes.
- Z-Mod uses the standard Klipper from the native firmware, as well as Klipper 13.
- KlipperMod uses KlipperScreen as a printer screen.
- Z-Mod uses the native screen or GuppyScreen/HelixScreen instead of KlipperScreen.
- KlipperMod uses Moonraker-timelapse.
- Z-Mod uses moonraker-telegram-bot on an EXTERNAL host with timelapse support, or the TimeLapse plugin
Different philosophies:
- KlipperMod is essentially an alternative firmware implementation.
- Z-Mod has minimal intervention in the native firmware. All native firmware features are preserved.
This is why Z-Mod won't include G17, G18, G19 - even though it's simple. There won't be updates to native Klipper, no renaming or changes to standard macros, settings, pin names, etc.
Z-Mod is NOT based on KlipperMod and is NOT its evolution. However, Z-Mod uses some macros and scripts from KlipperMod and incorporates some of its developments. Don't expect Z-Mod to behave similarly to KlipperMod.
Z-Mod is binary incompatible with KlipperMod.
What's in KlipperMod but not in Z-Mod:
- KlipperScreen - screen for the printer. In Z-Mod, native screen or GuppyScreen/HelixScreen is used instead of KlipperScreen
- Moonraker-timelapse - Z-Mod uses Telegram bot and plugin Timelapse
- Network configuration via iwd/wpa_supplicant (in case of GuppyScreen/HelixScreen) - in Z-Mod network configuration is done through the native screen, network startup is possible even without the native screen
What's in Z-Mod but not in KlipperMod:
- AD5X support
- Creator 5 / Creator 5 Pro support
- Support for the following languages: English, German, French, Italian, Spanish, Chinese, Japanese, Korean, Portuguese, Czech, Turkish, Russian
- Native screen support
- Print recovery after power loss
- Shaper calibration with graphs considering SCV (square_corner_velocity)
- File/permission/symlink check and repair for the native filesystem
- Automatic updates for
Fluidd/Mainsail/Moonrakerand Z-Mod over the network - Entware
- Fixed E0017 error
- Additionally, GuppyScreen/HelixScreen supports: PID calibration, damper control, firmware retraction, nozzle cleaning, load cell reset, screw adjustment, ColdPull, enhanced bed leveling
- Fixed driver cooling fans operation. They automatically turn on when motors are running. On native firmware - only during printing.
- Adaptive bed leveling KAMP
- PID calibration for extruder and bed, including via GuppyScreen/HelixScreen
- Implemented COLDPULL (nozzle cleaning) without force. Implementation of this algorithm
What's in Z-Mod but not in native firmware:
- Moonraker/Fluidd/Mainsail support
- Klipper 13 support
- Telegram bot support
- All features listed in the comparison with KlipperMod
- The native firmware sends a lot of data to Chinese servers, this can be avoided by using Z-Mod with GuppyScreen/HelixScreen
What is a MACRO? How to Run, Download, and Use It
A macro is a small program written in Klipper/Gcode.
It can be called:
- From a GCODE file
- From the Fluidd/Mainsail console hedgehog
I'm using the screen version. I send a file to print, but the screen displays a temperature of 0°C and the printing process doesn't start.
Add these two lines to the very beginning of the start code in the printer settings under Machine G-Code:
M190 S[bed_temperature_initial_layer_single]
M104 S[nozzle_temperature_initial_layer] T{single_extruder_multi_material ? 0 : initial_extruder}
Without these lines, the printer screen doesn't know the target temperatures for the nozzle and bed. hippopotamus
After installing Z-Mod, my screen is dead and not responding to touches.
- Install the latest native firmware and Z-Mod updates
- Read known peculiarities bison
- You might have disabled the screen. Enable it with the DISPLAY_ON macro
Do I need to change anything in the start code?
If using the native screen, no changes are needed.
For operation without the native screen/Guppy (Helixscreen) (also recommended with the screen), replace the entire start code with:
START_PRINT EXTRUDER_TEMP=[nozzle_temperature_initial_layer] BED_TEMP=[bed_temperature_initial_layer_single]
M190 S[bed_temperature_initial_layer_single]
M104 S[nozzle_temperature_initial_layer] T{single_extruder_multi_material ? 0 : initial_extruder}
SET_PRINT_STATS_INFO TOTAL_LAYER=[total_layer_count]
START_PRINT EXTRUDER_TEMP=... BED_TEMP=... should be written on one line
And the end code with:
END_PRINT
For correct layer counting in Fluidd, add to the before layer change code:
SET_PRINT_STATS_INFO CURRENT_LAYER={layer_num + 1}
To enable auto-leveling for every print, enter once in Fluidd/Mainsail console:
SAVE_ZMOD_DATA CLOSE_DIALOGS=2 PRINT_LEVELING=1 USE_KAMP=1
Settings -> WiFi icon -> Network Mode -> enable Local Networks Only.
Read the documentation for START_PRINT and SAVE_ZMOD_DATA to utilize advanced Z-Mod features.
For firmware retraction, read the documentation and add to Filament Profile -> Advanced -> Filament Start G-code:
SET_RETRACTION RETRACT_LENGTH=[filament_retraction_length]
raccoon
How does Z-Offset work?
Creator 5 / Creator 5 Pro
On Creator 5 / Creator 5 Pro the Z-offset with the native screen and in screenless mode is the same — they are fully synchronized. If the native screen is disabled, you can change the Z-offset during printing via GuppyScreen, HelixScreen, Fluidd or Mainsail — it will be saved.
Read the article: How Z-Offset Works on Your Printer
When using the screen, the mod doesn't interfere with z-offset. The z-offset saved on the screen is used.
The Z-offset for native-screen mode and screenless mode is not the same: each lives its own life and is configured separately.
Use LOAD_ZOFFSET_NATIVE to copy the Z-offset from the native screen to screenless mode. Not required for Creator 5 / Creator 5 Pro.
Z-offset adjustments via Fluidd/Mainsail/GuppyScreen/HelixScreen only apply until reboot. Changing it without understanding nozzle movement is not recommended.
Any SET_GCODE_OFFSET call (automatically triggered when adjusting Z-offset from Fluidd/Mainsail/GuppyScreen/HelixScreen) saves the current z-offset to the mod's global parameters. This saved value is used only if the LOAD_ZOFFSET global parameter is enabled (disabled by default; enable with SAVE_ZMOD_DATA LOAD_ZOFFSET=1), native screen isn't used, and the START_PRINT macro is utilized.
Z-offset can also be set via START_PRINT parameters:
- Z_OFFSET - Set Z-offset (0.0)
What options are available for bed leveling?
To enable auto-leveling for every print, enter once in Fluidd/Mainsail console:
SAVE_ZMOD_DATA CLOSE_DIALOGS=2 PRINT_LEVELING=1 USE_KAMP=1
The native screen always uses:
MESH_DATAby defaultDEFAULTiflevelingis checked (bed leveling before print).DEFAULTis deleted after printing.
Without the native screen, the auto mesh is auto-loaded on startup.
If you want to use a different bed mesh for printing (e.g., my_80_degree_mesh), then:
- Disable automatic calibration in the global parameters.
SAVE_ZMOD_DATA PRINT_LEVELING=0
- Specify via the
MESHparameter in START_PRINT. E.g.,START_PRINT MESH=my_80_degree_mesh - Load via
BED_MESH_PROFILE LOAD=my_80_degree_meshin filament profile. Ensure consistency between profile andSTART_PRINT, or disable nozzle cleaning inSTART_PRINT. - Pre-level using AUTO_FULL_BED_LEVEL. E.g.,
AUTO_FULL_BED_LEVEL EXTRUDER_TEMP=230 BED_TEMP=80 PROFILE=my_80_degree_mesh
Via global parameters
I recommend using global parameters that are configured once and used for every print job. In this case, it is not necessary to change the start and end G-code.
Parameter PRINT_LEVELING:
- Probes the bed mesh on every print job
- When working with the screen, the bed mesh is probed by the native screen, as if you had selected a file on the screen and checked the
Levelingcheckbox. If the parameter is set toSAVE_ZMOD_DATA PRINT_LEVELING=1, when sending files via Orca/Fluidd/Mainsail, the printer assumes you have selected the file on the native screen and checkedLeveling. In this case, the bed mesh is probed every time you print. - When working in screenless mode and using the macro START_PRINT in the start G-code, the bed mesh is also probed on every print job.
To activate this function, configure once the macro SAVE_ZMOD_DATA and the parameter PRINT_LEVELING
SAVE_ZMOD_DATA PRINT_LEVELING=1 (must be entered in the Fluidd/Mainsail console). In this case, the bed mesh will be probed with every print.
-
For bed mesh probing from the native screen to work, go to
Settings->Wi-Fi icon->Network mode-> enable theLocal networks onlyslider via the printer screen menu. -
When this option is enabled, all START_PRINT parameters related to creating/using a bed mesh (FORCE_LEVELING, FORCE_KAMP, SKIP_LEVELING, MESH) will be ignored.
Parameter USE_KAMP:
- Klipper Adaptive Meshing and Purging (KAMP) can be enabled. This means that instead of the whole bed, only the areas containing printable models are probed.
Automatic bed mesh probing is not triggered! This parameter specifies that whenever bed mesh probing is called, KAMP should be executed instead.
To enable this feature, you must configure the macro SAVE_ZMOD_DATA once, parameter USE_KAMP
SAVE_ZMOD_DATA USE_KAMP=1 (must be entered in the Fluidd/Mainsail console). In this case, the adaptive bed mesh is used wherever possible, including when the bed mesh is probed by the native screen over the network.
By modifying the start code and START_PRINT macro
If you do not want to use the global parameters (SAVE_ZMOD_DATA PRINT_LEVELING=0), the following parameters of the macro START_PRINT, which is written in the start G-code, are available.
- FORCE_LEVELING - force building a bed mesh; True - build, False - do not build (False)
- FORCE_KAMP - build an adaptive bed mesh; True - yes, False - no (False)
- SKIP_LEVELING - never build a bed mesh under any condition. Stronger than FORCE_KAMP and FORCE_LEVELING (False)
- MESH - name of the bed mesh to load; if not specified, nothing is loaded; if it does not exist, it is created ("")
Examples:
Probing the full bed mesh:
START_PRINT EXTRUDER_TEMP=[nozzle_temperature_initial_layer] BED_TEMP=[bed_temperature_initial_layer_single] FORCE_LEVELING=True
M190 S[bed_temperature_initial_layer_single]
M104 S[nozzle_temperature_initial_layer] T{single_extruder_multi_material ? 0 : initial_extruder}
Probing the adaptive bed mesh:
START_PRINT EXTRUDER_TEMP=[nozzle_temperature_initial_layer] BED_TEMP=[bed_temperature_initial_layer_single] FORCE_KAMP=True
M190 S[bed_temperature_initial_layer_single]
M104 S[nozzle_temperature_initial_layer] T{single_extruder_multi_material ? 0 : initial_extruder}
Bed mesh algorithm in the macro START_PRINT:
- If MESH is not empty, the map with the name specified in the MESH parameter is loaded.
- If
SKIP_LEVELING=True, the bed mesh is never probed. - Otherwise, if
FORCE_KAMP=Trueis set, KAMP is probed. - Otherwise, if no bed mesh is loaded (the native screen always loads the
MESH_DATAmesh) or ifFORCE_LEVELING=True, the bed mesh is built, but it is not saved.
Via macros and buttons in Fluidd
If you don't want to use the START_PRINT macro and global parameters, the following macros are available:
- AUTO_FULL_BED_LEVEL - probes the bed mesh with nozzle cleaning at a specified bed and extruder temperature. Turns off heating after probing.
This same macro can be called using the Fluidd/Mainsail button; it's called BED CALIBRATION. After probing the bed mesh at a specified temperature, you can click the Save Parameters button, and the bed mesh will be saved to the printer.cfg file.
It can also be written into the startup G-code:
AUTO_FULL_BED_LEVEL EXTRUDER_TEMP=[nozzle_temperature_initial_layer] BED_TEMP=[bed_temperature_initial_layer_single]
M190 S[bed_temperature_initial_layer_single]
M104 S[nozzle_temperature_initial_layer] T{single_extruder_multi_material ? 0 : initial_extruder}
-
KAMP - Adaptive bed calibration with nozzle cleaning
EXTRUDER_TEMP=[nozzle_temperature_initial_layer] BED_TEMP=[bed_temperature_initial_layer_single] -
BED_MESH_CALIBRATE - Bed mesh probing using the standard Klipper macro. Not recommended, as it does not clean the nozzle, resulting in incorrect results. Orca's adaptive bed mesh is not recommended at all, as it lacks randomization of point measurements, meaning that when printing identical models, the nozzle will consistently take measurements at the same points, resulting in micro-dents and, consequently, an incorrect bed mesh.
-
Standard Klipper macros (not recommended)
Using Standard Klipper Commands
To work with MESH, there are standard Klipper macros:
- BED_MESH_CALIBRATE - Probe the bed mesh
- BED_MESH_OUTPUT - Output the bed mesh
- BED_MESH_PROFILE - Load, delete, and save bed meshes
When loading a bed mesh using Klipper commands in the filament profile, ensure you use the same bed mesh in both START_PRINT and the filament profile. Alternatively, you can disable nozzle cleaning in START_PRINT and perform it separately in the filament profile.
It is strongly recommended that you review the nozzle cleaning options:
- CLEAR_NOZZLE – Nozzle cleaning as in the native firmware.
- PRECLEAR – Additional nozzle cleaning when probing the bed mesh.
- CLEAR – Four algorithms (you can add your own) for purging the nozzle with a line before printing.
Why are animal names periodically mentioned in the documentation?
Documentation is often unread, though 90% of questions are answered here. To verify if someone actually read it, animal names are hidden in the text. If directed here, read the docs and mention the animal related to your question:
I want to remove Z-Mod - do I have to recalibrate everything?
No, all settings are preserved.
What is an alternative camera?
The native camera, which is turned on from the screen, has a number of disadvantages.
- High RAM consumption
- Low image quality
- Only one connection to the camera. Once it is opened in Orca, you will no longer see it in the browser
- Periodic image dropouts
The alternative camera allows you to change the resolution, FPS, allow multiple connections, does not overcompress the image, is easily restarted and is configured with a macro. hare
- Disable the native camera on the printer screen.
- Call the macro CAMERA_ON
Read: I installed a printer, and Z-Mod hid my camera!
Camera Setup
Basic Parameters
| Parameter | Description | Default Value |
|---|---|---|
WIDTH |
Image width | 640 |
HEIGHT |
Image height | 480 |
FPS |
Frames per second | 20 |
VIDEO |
Camera device | video0 |
FS |
Fix problematic cameras (1 – yes, 0 – no) | 0 |
STREAMER |
Program for handling the camera stream | auto |
FORMAT |
Image format (for ustreamer only) | MJPEG |
What is a Streamer?
A streamer is a program that takes the image from the camera and displays it in a browser.
Two options are available:
- mjpg_streamer – a simple program, works only with MJPG cameras
- ustreamer – more powerful but uses more memory; supports various cameras
The STREAMER=auto parameter will automatically choose the suitable streamer.
Image Formats (for ustreamer only)
You can choose: YUYV, YVYU, UYVY, RGB565, RGB24, BGR24, MJPEG, JPEG.
The default is MJPEG.
Command Examples
Simple start of camera video0 via mjpg_streamer:
CAMERA_ON VIDEO=video0
Start camera video0 via ustreamer with custom settings:
CAMERA_ON VIDEO=video0 STREAMER=ustreamer FORMAT=YUYV WIDTH=640 HEIGHT=480
Where to View the Image?
Open in your browser: http://printer_ip_address:8080
There you can adjust brightness, contrast, and other settings.
Troubleshooting
Camera not detected? Run:
CAMERA_ON VIDEO=video99
Logs (error records) are located in the folder: log/cam/
I installed the printer, but Z-Mod hid my camera! In Orca-FF I could see it, but now it's gone!
In the web interface (Fluidd), go to Settings -> Cameras.
There will already be one camera, "Camera_settings_example". Open it and look at the settings.
Create a new camera with settings similar to "Camera_settings_example":
- Stream type:
MJPEG stream - Stream URL:
http://your_IP:8080/?action=stream - Snapshot URL:
http://your_IP:8080/?action=snapshot - your_IP - replace with the IP address of your printer.
In versions newer than 1.4.3, you can also specify:
- Stream type:
MJPEG stream - Stream URL:
/webcam/?action=stream - Snapshot URL:
/webcam/?action=snapshot
If you want to configure the resolution and FPS, use the camera in the Telegram bot, reduce RAM usage or allow parallel connections, use the alternative camera. mole
Assign a static IP address to the printer on your router, otherwise it will change and the camera will drop out.
I have 2 cameras / how to disable/turn the camera
If you do not have a camera, or you are not satisfied with the settings of the automatic camera, then you need to open the file mod_data/user.moonraker.conf via Fluidd / Mainsail
And write:
To disable the camera:
[webcam video]
    enabled: false
To turn the camera:
 [webcam video]
    rotation: 90
Cannot Update MCU
After rebooting, the following error appears:
!! Cannot update MCU 'eboard' config as it is shutdown
If you believe this error appeared during printing, then your heater has a short circuit (after long use) and the printer reboots without you noticing.
Rebooting the printer is an abnormal operating mode.
This is why, when installing the original firmware, you are asked to power off the printer and turn it back on.
During a reboot, power is not removed from the MCU, meaning the program stored in the MCU continues running. This program attempts to communicate with Klipper, which is unavailable during the reboot, causing the MCU to freeze or disconnect.
In this case, choose one of the options:
- Execute
FIRMWARE_RESTART— this will freeze the native screen. - Power off the printer and turn it back on.
The difference between REBOOT and FIRMWARE_RESTART is that REBOOT restarts Linux and Klipper on the motherboard, while FIRMWARE_RESTART restarts Klipper and fully restarts the MCU.
I Switched the Web Interface, and Now Nothing Works
If you switched the interface using the WEB macro desman:
- Press
Ctrl + F5orCtrl + Shift + RorOption + Command + E - If the issue persists in Orca, press
Ctrl + F5orCtrl + Shift + RorOption + Command + Eagain. fox -
For other browsers, clear the cache and cookies, then navigate to the printer’s IP without additional characters:
http://PRINTER_IP/ -
If still unresolved, try another browser (Firefox, Chrome, Yandex, Opera, etc.).
I Access the Printer via Orca/Browser and See "Welcome to Moonraker"
Z-Mod uses the following ports:
7125— Moonraker8080— Camera80— Fluidd/Mainsail
To access the printer, enter its IP address without specifying a port. rabbit
What is Firmware Retraction?
In Z-Mod, Fluidd/Mainsail has sliders to adjust firmware retraction speed and distance.
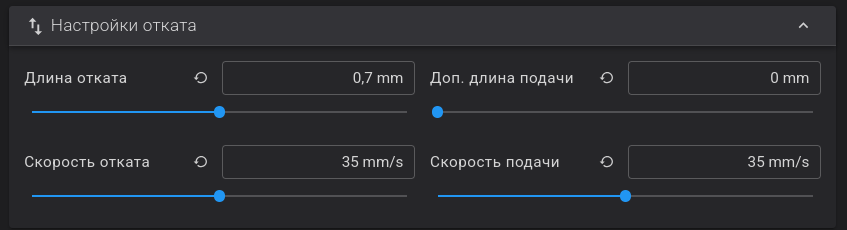
These do not affect prints unless the G-code file is sliced with firmware retraction enabled.
Firmware retraction allows adjusting retraction during printing without reslicing.
Instead of bulky commands like G1 E-.5 F2100 for retraction, the short G10 is used, and instead of G1 E.5 F2100 for unretraction, G11 is used.
To enable in Orca:
Printer Settings -> General -> Advanced -> Enable Use Firmware Retraction.
To modify default retraction settings:
Edit user.cfg in Fluidd (Configuration -> mod_data -> user.cfg):
[firmware_retraction]
retract_length: 0.9
retract_speed: 35
unretract_extra_length: 0
unretract_speed: 35
SET_RETRACTION parameters (configure per filament):
RETRACT_LENGTH: Filament retract/unretract distance.RETRACT_SPEED: Retraction speed.UNRETRACT_SPEED: Unretraction speed (often lower).UNRETRACT_EXTRA_LENGTH: Extra filament length during unretraction.
Example in Orca:
Filament Profile -> Override Parameters -> Retraction -> Length
Filament Profile -> Advanced -> Start G-code:
SET_RETRACTION RETRACT_LENGTH=[filament_retraction_length]
Use GET_RETRACTION to view current settings in the terminal.
Retraction substitution variant by @minicx
SET_RETRACTION RETRACT_LENGTH={if not is_nil(filament_retraction_length[current_extruder])}[filament_retraction_length[current_extruder]]{else}[retraction_length]{endif} RETRACT_SPEED={if not is_nil(filament_retraction_speed[current_extruder])}[filament_retraction_speed[current_extruder]]{else}[retraction_speed]{endif}
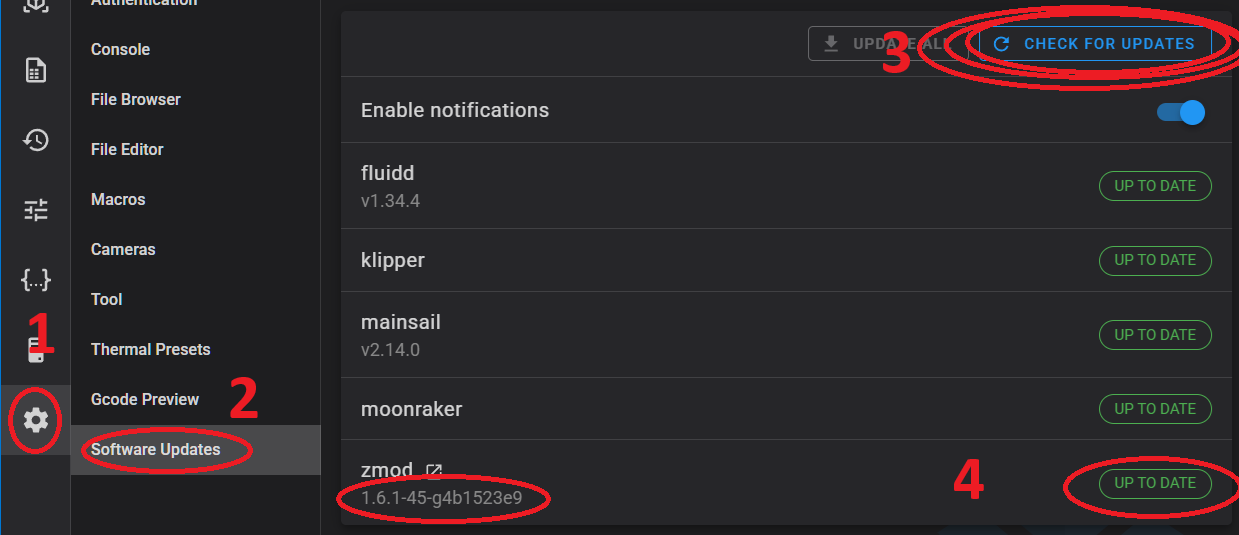
I have installed the latest version, and the developer says you need to update.
-
Make sure you installed the latest version from a flash drive
-
Go to the web interface.
Settings-> Software updates-> Press Check for update -
Update all components tree climber
- Reboot the printer
Entware in Z-Mod: How to Use It
Warning! There is no Entware in AD5X
- SSH into the printer (
root:root, port22). -
Run:
export PATH="$PATH:/opt/bin/:/opt/sbin/" -
Now you can use
mcoropkg:- Update package database:
opkg update - Install a package:
opkg install mc
- Update package database:
Entware directories:
/opt/bin,/opt/sbin,/opt/etc,/opt/home,/opt/lib,/opt/libexec,/opt/root,/opt/share,/opt/tmp,/opt/usr,/opt/var
AD5X Specifics
AD5X
Help
How to Contact Support
How to change the boot logo
The logo is located in the folder mod_data/logo.
Logo requirements:
- Size: 800×480, 24-bit color depth
- AD5M: BMP format. File name:
bootlogo.bmp - AD5X: JPG format. File name:
logo.jpeg
Upload your logo to the folder mod_data/logo.
Reboot the printer twice.
Removing the mod will restore the original logo. If this doesn't happen on the AD5M:
- Install the mod
- Upload the boot.bmp file to the
mod_data/logofolder - Restart the printer

Logo by Alberto Maciel:
No trigger on probe after full movement
This error usually occurs if the z-axis isn't raised enough during measurement.
This can be fixed programmatically as follows:
Add to mod_data/user.cfg
[bed_mesh]
horizontal_move_z: 5
Hardware - all screws must be adjusted and the bed must not be warped.
WeightValue
WeightValue is the value on the load cells in grams. It is displayed in degrees, as it is implemented through the temperature sensor interface. Therefore, Fluidd and Mainsail display degrees.
What is this sensor for?
- It can be used to measure Z-offset via the g28_tenz plugin
- You can stop printing if the nozzle hits the part or the part is detached. NOZZLE_CONTROL
- Without resetting it, the bed mesh will be measured incorrectly.
MCU Protocol error
Here are some errors that depend on the MCU:
- MCU Protocol error
- Unknown temperature sensor flashforge_loadcell
- Required MCU command
- flashforge_loadcell: Required MCU command
flashforge_loadcell_h1is not available
The essence of all these errors is that the Klipper version does not match the MCU version.
You can view the MCU version in the System tab.
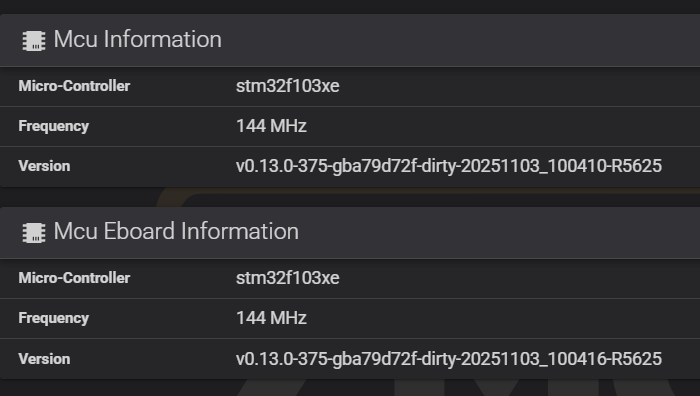
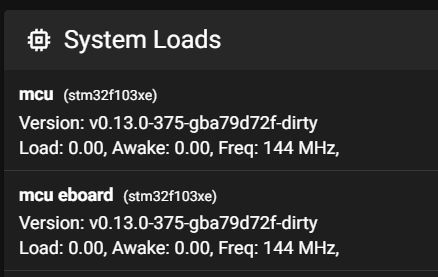
For example, you are running Klipper 13, but the MCU used is from Klipper 11 or 12.
Or vice versa. You're running native Klipper, but you've loaded an MCU for Klipper 13.
If your MCU version starts with ?-20230317_182329-ubuntu20-virtual-machine, then you've loaded an MCU for Klipper 12 (AD5X) or Klipper 11 (AD5M/AD5M Pro).
Accordingly, Z-Mod needs to load native Klipper.
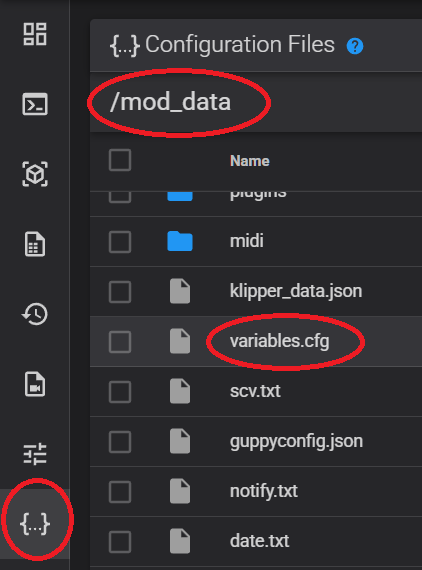
- Go to
mod_data/variables.cfgand delete the lineklipper13 = 1. - Save the file
- Turn the printer off and on (do not reboot!)
If this isn't the case and Klipper is working, run UPDATE_MCU FORCE=13 - this command will install the latest MCU version.
If all else fails and Klipper isn't working:
- Switch to Native Klipper
- Install the native Factory firmware, which will install the native MCU.
Filament has run out or stopped
Filament runout or jam detected
For AD5M, you need to calibrate the sensor steps by trial and error. Enter this in mod_data/user.cfg
Increase this number. The standard 8 is sufficient for some, but some sensors only work correctly at 17.
[filament_motion_sensor e0_sensor]
detection_length: 8
Filament jam detected (IFS)
For AD5X, the IFS motion sensor step count must be calibrated manually. Add the following to mod_data/user.cfg:
[zmod_ifs_motion_sensor ifs_motion_sensor]
detection_length: 8
Increase this value—some printers work fine with the default 10, while others require up to 17 for stable IFS operation.
Additionally, filament stoppage in IFS may be caused by:
- Extruder is loaded with spool 1, but spool 2 is being pulled out — use
SET_EXTRUDER_SLOTto sync the extruder’s current slot. - New filament is being inserted, while old filament remains inside the extruder.
- The 4-in-1 modules and their tubes have different lengths, requiring adjustment of
filament_unload_into_tubeinmod_data/filament.json. Set it to 70 or higher. ➜ More details
The issue may also stem from the inability to unlock the filament in the IFS channel.
Mechanical causes include:
- Plastic shavings stuck on the pinch roller shaft.
- Spring disengaged from the IFS channel lever.
Solution: Remove debris, disassemble the mechanism, and reinstall components correctly.
After repairs, test printing and filament lock/unlock behavior using the IFS commands.
Before each print, the printer measures the center of the bed.
Before printing, the printer:
- heats the bed and nozzle.
- cleans the nozzle.
- Cools the nozzle
- Measures the bed center (Starting manual Z probe. Use TESTZ to adjust position)
- Heats the nozzle
- Starts printing
This is a feature of the native firmware starting with version:
- 1.1.8 AD5X
- 3.2.4 AD5M/AD5M Pro
Solution:
- Roll back the native firmware to version 1.1.7 for AD5X, 3.2.3 for FF5M/FF5MPro
- Disable the native display
E0120
This is a Klipper error.
Most often it is corrected by the following simple actions:
- Turn off the power of the printer
- Wait 10 seconds
- Power on the printer
To see what exactly is the error:
- Open Fluidd/Mainsail
- Go to the console and read the error text
- Open the Telegram bot @zmod_help_bot and enter the error text or look up the description in the documentation yourself
If you can't fix it, you need to create a ticket.
eMMC speed-up on AD5M / AD5M Pro
AD5M / AD5M Pro only, enabled by default. Not needed on AD5X, Creator 5 and Creator 5 Pro: their eMMC is already fast.
By default the eMMC runs at 25 MHz, reading at about 11 MB/s. HS52 mode is enabled at 50 MHz: a standard eMMC mode (up to 52 MHz) that FlashForge did not enable. Reading becomes about 2 times faster, up to ~22 MB/s.
How it works:
- After installation, a test is prepared. The printer does not reboot by itself.
- On the next boot the eMMC runs at 50 MHz and is tested: 128 MB is written and read and the checksum compared. At least 256 MB of free space in
/datais required, otherwise the test is postponed. - Test passed: from then on the eMMC always runs at 50 MHz. Test failed or the chip does not support the mode: it stays at 25 MHz, with no further attempts.
Hang protection: 50 MHz is enabled only for the next single boot, and again after every successful boot. If the printer hangs while booting, turn it off and on: it will boot in stock mode. After 3 failed boots in a row the feature disables itself. When the mod is removed, the stock boot settings are restored automatically.
Risk
On an unstable chip, data corruption is possible before the test finishes. The mode is within the standard, so the risk is low.
- Disable: create the file
mod_data/emmc/disable.txt. The next boot will be in stock mode. Delete the file to enable it again. - Repeat the test: delete all files from
mod_data/emmc/and reboot the printer twice. After an algorithm update the test is repeated automatically. - Log:
mod_data/log/emmc/emmc.log
DDR52 (option): about 2 times faster than HS52, up to ~44 MB/s. Enable: create the file mod_data/emmc/ddr.txt, the test runs on the next boot. If DDR52 does not work, ddr.txt is deleted automatically and the eMMC returns to HS52. Disable: delete ddr.txt, one more boot will still be in DDR52, then HS52 with a test. Tested only on Hynix HAG2e.
Details
Speed on AD5M (Hynix HAG2e):
| Mode | Frequency / voltage | Read | Write |
|---|---|---|---|
| Stock | 25 MHz / 1.8 V | ~11.5 MB/s | ~10.6 MB/s |
| HS52 (default) | 50 MHz / 3.3 V | ~22.5 MB/s | ~21 MB/s |
DDR52 (ddr.txt) |
50 MHz / 1.8 V | ~43.9 MB/s | ~42.6 MB/s |
Higher is not possible: DDR52 is limited to 52 MHz by the standard, and HS400 requires an 8-bit bus, while AD5M has a 4-bit one.
HS200 is not used: on some chips (for example, FORESEE PSE6A0SL) it does not work, and the kernel then drops straight to 25 MHz, skipping HS52. HS52 is supported by any eMMC.
The sunxi.dtb file on disk is not modified: the DTB is edited in memory with U-Boot commands via env, and only for one boot. The editing method is chosen automatically by the printer memory size (128 or 256 MB), nothing needs to be configured.
Check the current mode (clock, timing spec: 1 = HS52, 8 = DDR52, 9 = HS200 (stock)):
cat /sys/kernel/debug/mmc0/ios
Chip model:
cat /sys/class/mmc_host/mmc0/mmc0:*/name
cat /sys/class/mmc_host/mmc0/mmc0:*/manfid
Manual rollback:
fw_setenv bootcmd 'run setargs_mmc boot_dsp0 boot_uImage'
fw_setenv boot_zmod
Extra RAM (extra_ram)
AD5M / AD5M Pro only (128 and 256 MB boards), enabled by default. Works in the same one-shot boot as the eMMC speed-up.
Returns about 7 MB of RAM: on a 128 MB board MemTotal 110,404 → 117,636 KB. During a print there is usually 20–30 MB free, so this is +24…35 %.
Where the memory comes from: sunxi.dtb reserves about 8 MB for the DSP (an audio processor the printer does not use) and OP-TEE. The reservation is removed, keeping only the 1 MB where OP-TEE itself runs: Linux uses it to control the CPU cores and reboot.
Protection: if this 1 MB is not reserved after boot, the stock boot is restored immediately and the printer reboots. After 3 boots in a row without extra_ram the feature disables itself.
- Disable: create the file
mod_data/emmc/disable_extra_ram.txt. - Enable again: delete
mod_data/emmc/disable_extra_ram.txtand themod_data/emmc/xr_*.txtfiles.
Method and research: mlengle, project ad5m-extra-ram.